by
Vincent Jianglast updated on
Apr 3, 2023
|
7 min read
|
0 views
D3.jsApp Development
Get started for free right now!
Sign up
General steps of creating a D3 app
Building an app with D3.js involves several steps, from setting up the environment to creating visualizations using D3.js. Here's a step-by-step guide to help you build an app with D3.js:
1.Set up the environment: a. Install Node.js: Visit the Node.js website (https://nodejs.org/) to download and install the latest stable version. b. Create a new project folder: Create a new folder for your app and navigate to it using the command line or terminal. c. Initialize a new npm project: Run npm init and follow the prompts to create a package.json file. d. Install D3.js: Run npm install d3 --save to install D3.js and save it as a dependency in your package.json file. e. Install a local web server (optional): You can use a local web server to serve your files, such as http-server. To install it, run npm install http-server -g.
2.Create an HTML file: a. In your project folder, create a new file called index.html. b. Set up the basic HTML structure, and include the D3.js library by adding the following code:
<!DOCTYPE html><html><head><metacharset="utf-8"/><title>D3.js App</title><script src="https://d3js.org/d3.v6.min.js"></script></head><body><!-- Your visualization will be placed here --><script src="app.js"></script></body></html>
3. Create a JavaScript file: a. In your project folder, create a new file called app.js. b. In app.js, you will write the D3.js code to create your visualization.
4. Load data: If your app requires external data, you can load it using D3.js's built-in functions, such as d3.csv(), d3.json(), d3.tsv(), or d3.text().
d3.csv("data.csv").then(function(data) {
  // Process and visualize the data here
});
5. Create visualizations: Use D3.js's selection, data binding, and transformation capabilities to create your desired visualization. Here's an example of creating a simple bar chart:
// Set up the SVG container for the chartconst svg = d3
.select("body")
.append("svg")
.attr("width", 800)
.attr("height", 400);
// Define the data for the chartconst data = [80, 120, 60, 150, 200, 100, 180];
// Create the bars
svg
.selectAll("rect")
.data(data)
.enter()
.append("rect")
.attr("x", (d, i) => i *100+50)
.attr("y", (d) =>400- d)
.attr("width", 50)
.attr("height", (d) => d)
.attr("fill", "steelblue");
6. Style your visualization (optional): You can use CSS to style your visualization. Create a new file called styles.css in your project folder, and link it in your index.html:
<link rel="stylesheet" href="styles.css"/>
add CSS rules to styles.css to style your visualization elements:
7. Add interactivity (optional): You can use D3.js to add interactivity to your visualizations. For example, you can add mouse events to your elements:
// Add mouseover and mouseout events to the bars
svg
  .selectAll("rect")
  .on("mouseover", function(event, d) {
    d3.select(this).attr("fill", "orange");
  })
  .on("mouseout", function(event, d) {
    d3.select(this).attr("fill", "steelblue");
  });
8. Serve your app: If you installed a local web server like http-server, navigate to your project folder in the command line or terminal, and run http-server. Then, open your browser and navigate to the specified address (e.g., http://localhost:8080/).
9. Iterate and refine: As you work on your app, you can continue to refine your visualizations, add more features, and improve the overall user experience.
These steps provide a general outline for building an app with D3.js. The specific implementation will vary depending on your visualization requirements and desired features. The D3.js documentation (https://d3js.org/) and various tutorials and examples available online are excellent resources to help you learn more about creating visualizations with D3.js.
Building an app using D3.js involves a series of steps, from setting up the development environment to crafting custom data visualizations with the library. This guide provides a step-by-step guide to help you create an interactive and visually appealing app using D3.js:
How to create a D3.js app on Acho
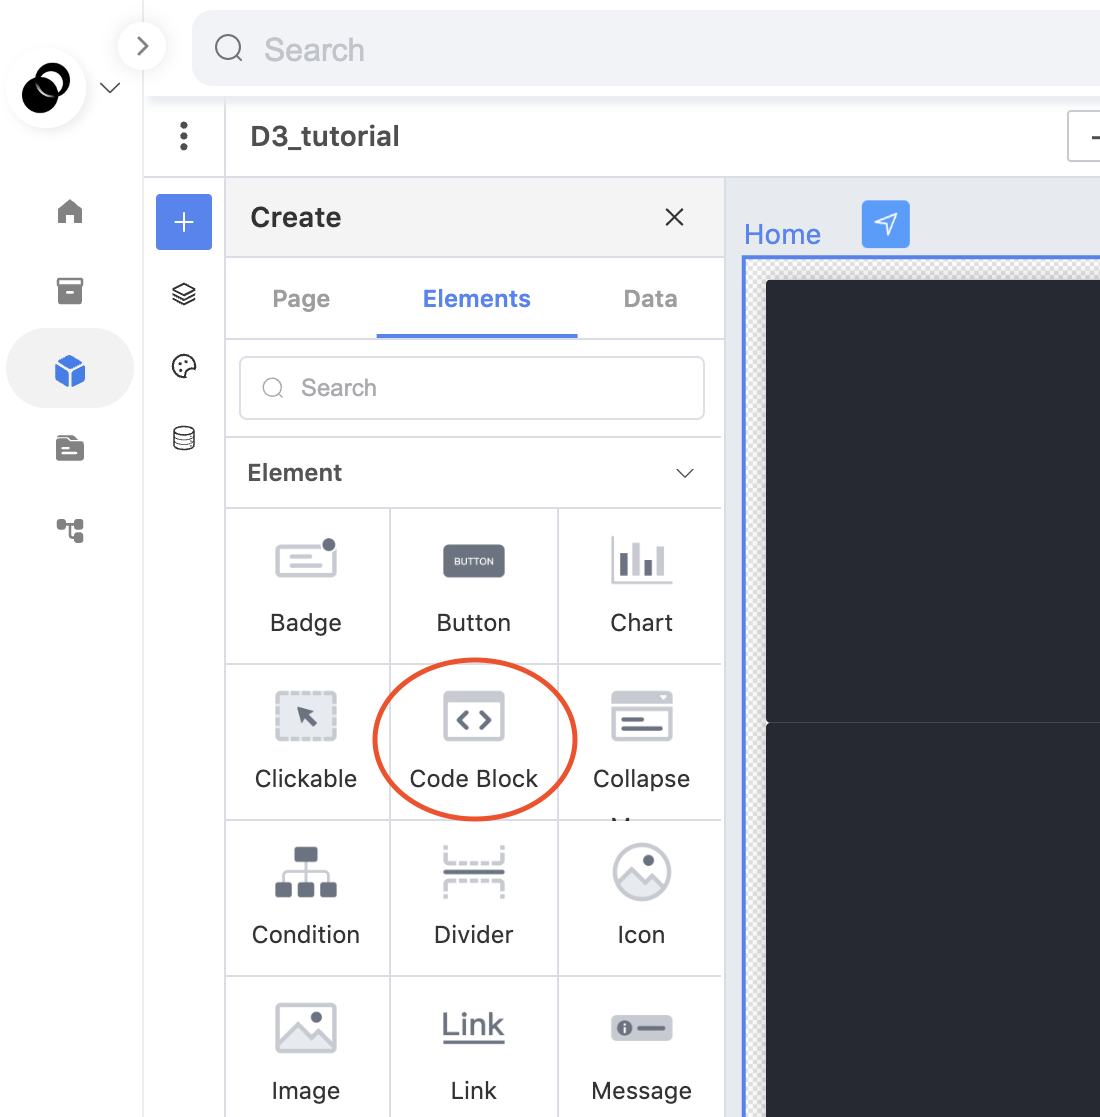
Step 1. Create Code Block element: Drag a Code Block element to the page
Step 2. Set identifier and load D3 library: As you begin to modify JavaScript within the code editor, you must initially assign an identifier to the Code Block element utilizing the 'root.id = ' syntax. This step enables you to subsequently select this specific Code Block element by referencing the assigned identifier. Following this process, it is needed to load the d3.js library prior to employing any D3-related functions. Upon successful loading of the D3 library, you will be able to execute any D3 code within the designated environment.
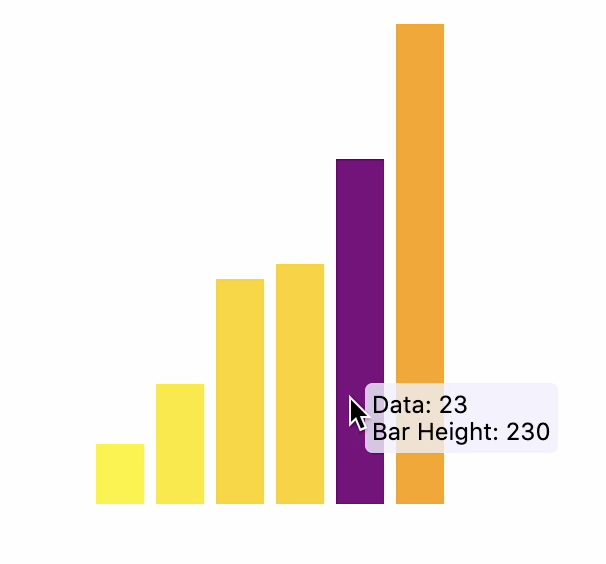
Step 3. Creating Visualizations: For example, you can use D3 to create charts with a diverse range of customized configurations. In the specific illustration presented herein, a chart is generated featuring a gradient color scheme as well as interactive tooltips that appear when users hover over the individual bars. The source code will be appended to the end of the article. You may try it yourself.
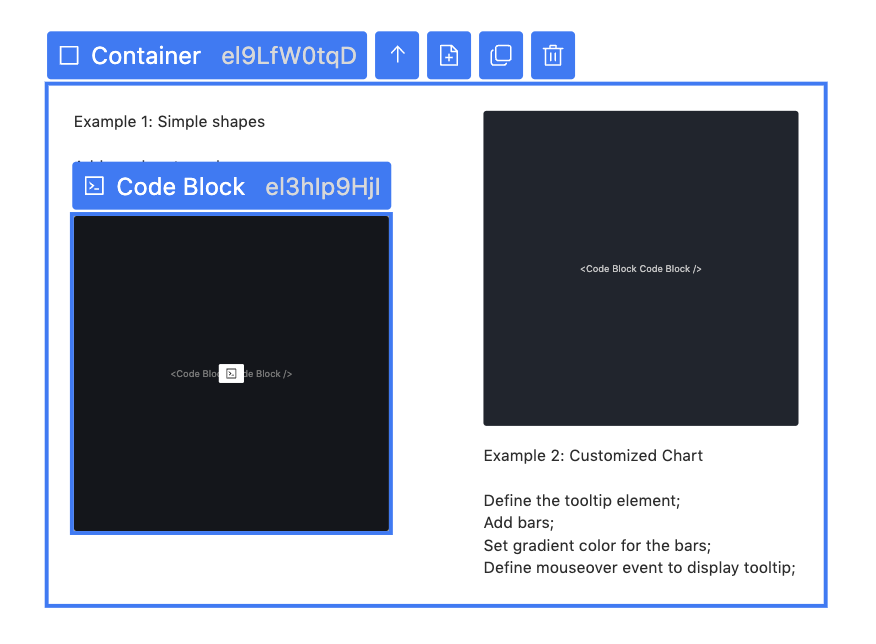
Step 4. Organize page:
It is very convenient to further organize the page using layout elements and styling in the app builder. You can use containers to arrange the placement and relationships among elements, use text elements to write descriptions, and use styling to set borders, margins, and paddings, thereby further enhancing the layout and organization of the page.
Step 5. Check out the live app
Source code: Example 1: Simple Shapes
functionsetupCode({emit,defineEvent,defineMethod,console},dependencies){functionrender(data,{root,rendered,props,getThemeValue}){// Set the ID of the current Code Block element to 'block_1'root.id='demo_1'// Load d3.js libraryconst$script=document.createElement('script');document.body.appendChild($script);$script.src="https://d3js.org/d3.v4.min.js";// When the D3.js script has loaded, execute the following code.$script.onload=function(){{d3.select('#demo_1').selectAll('svg').remove()// Select current Code Block by its id 'block_1', then create a new SVG element with a width and height of 400varsvg=d3.select('#demo_1').append("svg").attr("width",400).attr("height",400)// Append a rectangle element to the SVG elementsvg.append('rect').attr("x",50).attr("y",150).attr("width",100).attr("height",100).attr("stroke",'blue').attr("fill",'red')// Append a circle element to the SVG elementsvg.append('circle').attr("cx",150).attr("cy",150).attr("r",50).attr("fill",'rgba(0,0,100,1)');}}}return{render};}
Example 2: Customized Charts
functionsetupCode({emit,defineEvent,defineMethod,console},dependencies){functionrender(data,{root,rendered,props,getThemeValue}){// Set the ID of the current Code Block element to 'demo_chart'root.id='demo_chart'// Load d3.js libraryconst$script=document.createElement('script');document.body.appendChild($script);$script.src="https://d3js.org/d3.v4.min.js";// When the D3.js script has loaded, execute the following code.$script.onload=function(){{d3.select('#demo_chart').selectAll('svg').remove()// Select current Code Block by its id 'demo_chart', then create a new SVG element with a width and height of 400constsvg=d3.select('#demo_chart').append("svg").attr("width",400).attr("height",400)// Construct test dataconstdata=[4,8,15,16,23,32];// Create a linear scale function to map the data range to a color rangeconstcolorScale=d3.scaleLinear().domain([0,d3.max(data)]).range(["yellow","orange"])// Create tooltipvartooltip=d3.select("body").append("div").style("position","absolute").style("z-index","10").style("visibility","hidden").style("background-color","rgba(240, 240, 255, 0.8)").style("padding","5px").style("border-radius","5px").style("white-space","pre-wrap");// Create the bars and set event to activate tooltipsvg.selectAll("rect").data(data).enter().append("rect").attr("class","bar").attr("x",(d,i)=>40+i*40).attr("y",(d)=>400-d*10).attr("width",32).attr("height",(d)=>d*10).attr("fill",(d)=>colorScale(d)).on("mouseover",function(d){d3.select(this).attr("fill","purple");tooltip.html('Data: '+d+"<br>"+'Bar Height: '+d*10+"<br>");tooltip.style("visibility","visible");}).on("mousemove",function(){tooltip.style("top",(d3.event.pageY-10)+"px").style("left",(d3.event.pageX+10)+"px");}).on("mouseout",function(d){d3.select(this).attr("fill",(d)=>colorScale(d));tooltip.style("visibility","hidden");});}}}return{render};}
Contact us in the chat box on the bottom right corner of this page if you have any questions!