Data entry, which can be summarized as the process of entering information into computer systems, serves to digitize data for managerial purposes. The concept of data entry has a storied history, tracing back over a century to the invention of punched cards in the 1890s. As PCs and software have evolved rapidly, the challenge today isn't merely entering data but efficiently transmitting it to various systems. This becomes especially challenging for businesses with limited IT resources.
Today's landscape is rife with diverse systems, all vying for data. This ranges from internal tools like ERPs and CRMs, which are fed data by employees, to customer-facing apps that gather user information via forms. While platforms such as Google Forms, Typeform, and SurveyMonkey are instrumental in data collection, their integration capabilities with existing systems might be limited. Let's explore instances when you might want to submit data directly to a system:
- Access: Perhaps your system isn't compatible with desired end devices. For instance, if your employees use mobile phones or tablets, requiring mobility, the system might not offer a mobile application or a responsive web version.
- Direct Customer Input: Enabling customers to enter information directly can be challenging since many systems, like ERPs or CRMs, often don't provide customizable forms for such purposes.
- Cost Efficiency: Some systems charge per user seat. If only specific functionalities are required for employees, purchasing additional seats might not be cost-effective.
- User Experience: Enhancing the user experience by simplifying processes and introducing automation to a new interface can be a significant driver.
However, there's a foundational aspect to this entire discussion: the API. We will need to use the API to send the data to your system, it's recommended to search for "your software name + API." Finding the associated documentation usually indicates the feasibility of your intent. And if technical challenges seem daunting, rest assured, many of our non-technical clients have managed to set up their systems with very little help.
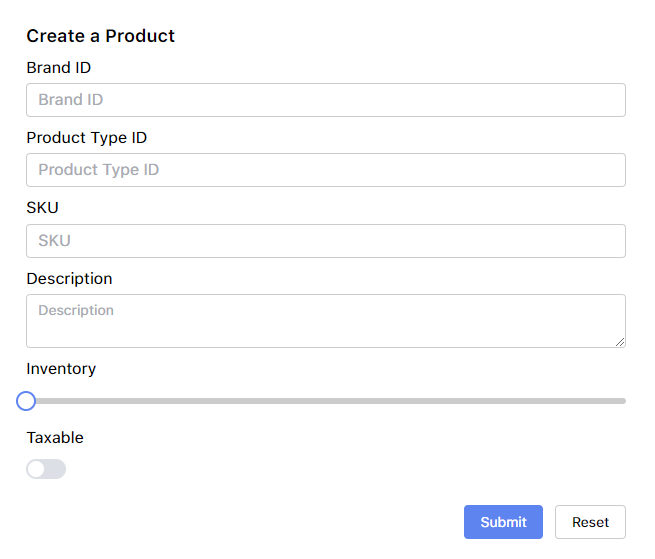
Now it’s time to start creating your own application to collect users’ input and send the data via API. If you haven't already, visit Acho and register an account. The next step is to create a Data App, where all your interfaces and services will be built. To complete the basic setup to achieve your goal, there are three steps. The first step is to set up the form for data entry. Use the Form element to design the form you wish to use for data submission. As you can see on the right side, both the input fields and the user interface are fully customizable.

The second step is to create the API service that sends this data over.

We'll use Brightpearl, a Retail Operating System, as an example to illustrate how to create a product in the system. According to the documentation, specific fields are required for the request. Let's modify our form to meet these requirements.
For the service we just created, we will need to define our inputs in the input schema on the right side first and use them as variables in the Body of the API call.

One of the critical steps in sending a request is authenticating the call. Brightpearl sets a high standard for its security protocol, requiring API calls to complete the OAuth flow for authentication. Consequently, we'll need to create an OAuth Client specifically for Brightpearl on Acho. Simply complete the form using the information from the Brightpearl Admin page.

Having set up both the user interface and the API service, the next step is to link them. Click on the form you configured earlier, and in the Interactions section, add an action to invoke the API service you just established after the "Submit" event. As illustrated in the screenshot below, you can align the input schema with the form values by selecting them. Once you click "Update", your application is all set.

Before publishing the app, you have the option to set it as public or private. Once published, you can embed it into your website/application or use it as a standalone app, and share it with your company.
